
Remove Apple Music DRM protection; Convert Apple Music to MP3, M4A,etc.

Download Spotify Music without premium; Convert Spotify Music to MP3.

Download Music from Tidal to your Computer; Convert Tidal Music to to MP3, M4A,etc.

Download Amazon Music Prime/Unlimited/HD; Convert Amazon Music to MP3.
How to Play Apple Music on iPod nano/iPod shuffle
By Sarah ConnorUpdated on July 22, 2020
- Summary:
In this article, you will discover two best effective solutions to play Apple Music on iPod nano/iPod shuffle, respectively recording Apple Music as MP3 and converting Apple Music M4P to MP3 losslessly.
When trying to sync downloaded Apple Music tracks to iPod Nano or Shuffle, you’ll probably get an error message saying “Apple Music songs cannot be copied to an iPod”. How to play Apple Music on iPods?
“I paid and started Apple Music streaming service, but Apple Music won’t work with my iPod nano device when I tried to sync my Apple Music tacks to my iPod nano. It says that Apple Music songs cannot be copied to an iPod. Can this problem be solved?”
Fail to copy your Apple Music to iPod nano and iPod shuffle? Any one Apple mobile phone users are aware, any song you add to your library from Apple Music has DRM applies to it, due to this restriction, you can’t keep a collection of songs on your iPhone, iPad, iPod and any other Android phones or MP3 Players. Removing DRM and converting Apple Music songs to normal audio file is the only way to enjoy them freely.
If you would like to enjoy your Apple Music on iPod nano/shuffle/classic for offline listening, there are two ways for your reference, respectively recording Apple Music streams to MP3 with Screen Recorder and convert Apple Music to MP3 with UkeySoft Apple Music Converter. In this article, we’ll show you steps to completely bypass Apple Music’s DRM lock and record Apple Music to MP3 format, so you can keep Apple Music songs forever and offline listen to Apple Music songs on iPod nano, iPod classic and iPod shuffle.
Solution 1: How to Remove DRM from Apple Music and Convert to MP3
With the help of UkeySoft Apple Music Converter software, you can easily strip DRM protected from Apple Music tracks then convert Apple Music M4P to plain MP3, AC3, M4A, FLAC. Then you can easily transfer these DRM -free songs to your iPod nano/iPod shuffle for offline listening.
- Remove DRM from Apple Music and iTunes M4P songs swiftly;
- Convert Apple Music to plain MP3, AC3, M4A, FLAC with lossless quality;
- The conversion speed from 1x to 16x is provided;
- Preserve all ID tags and metadata in output Apple Music files;
- Apply to latest Windows and Mac.
How to keep Apple Music songs playable on iPhone/iPad/iPod after canceling subscription? Watch this video guide on how to convert Apple Music to M4A or MP3, and then the DRM-free Apple Music to iPhone/iPod Touch/ iPod Shuffle/ iPod Nano for playing without paying.
Remove DRM from Apple Music and Sync to iPod Nano/iPod Shuffle
Step 1 Launch Apple Music Converter
Click on the download icon above to install Apple Music Converter onto your computer. Run it can check if it would connect with your latest iTunes automatically.
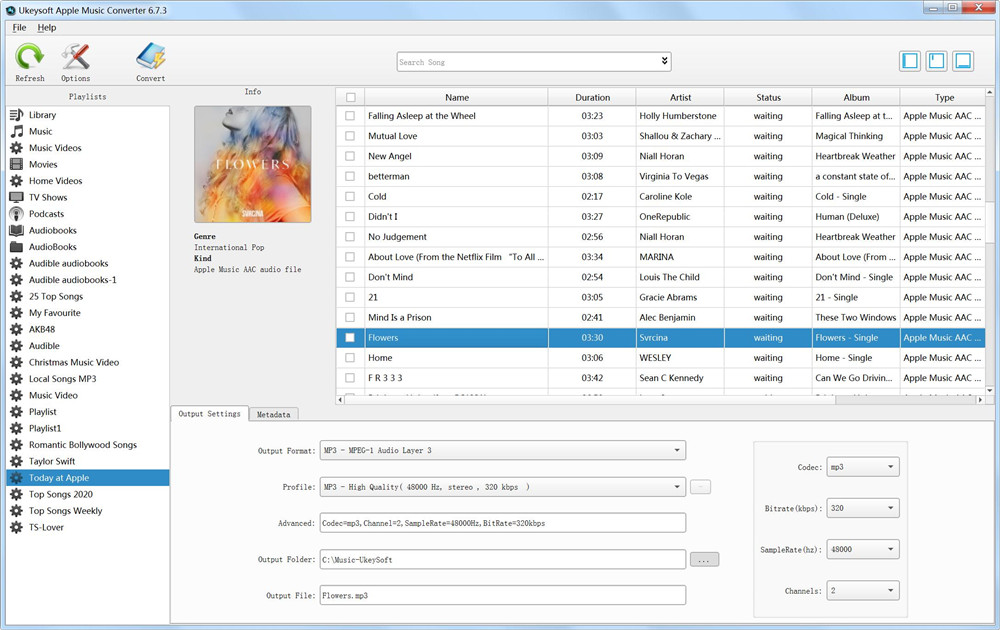
Step 2 Select Music
Since all your iTunes library will be loaded into this program, you can preview your Apple Music songs on the “Playlist” section. Then tick the songs of Apple Music in “Music” in “Playlists” directly.
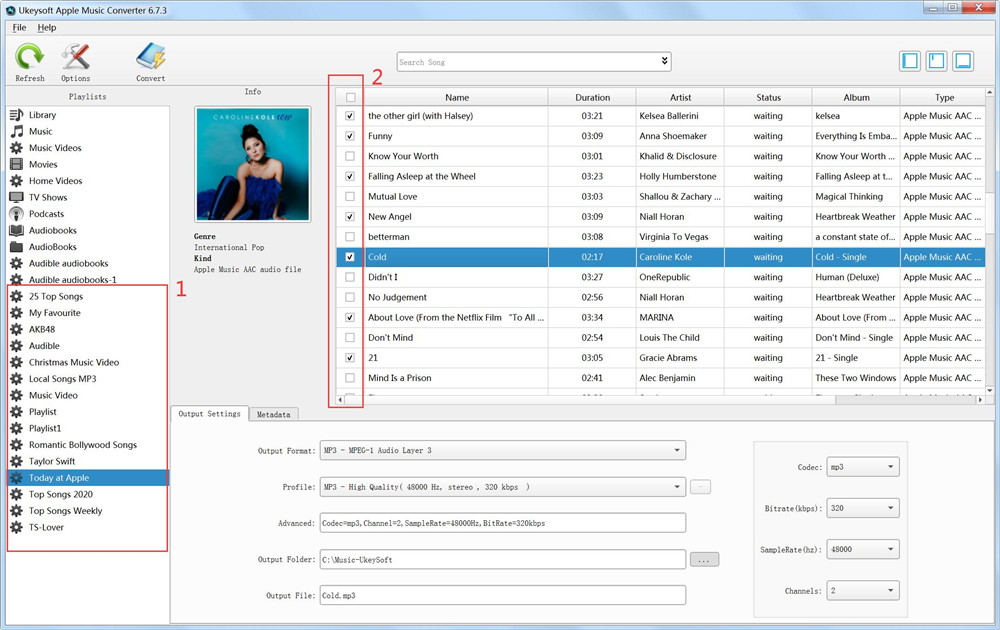
Step 3 Specify Output Format for iPod
On the “Output Settings” section, you need to specify an output format from the drop-down list, like MP3 and then choose a destination folder to save your converted Apple Music files.
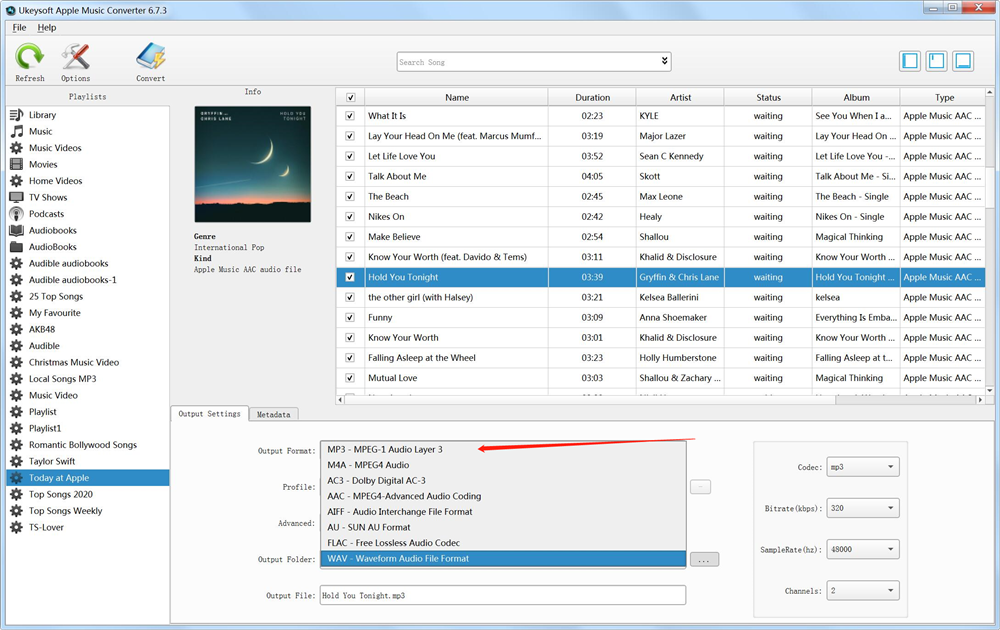
Step 4 Convert the DRM-ed Apple Music to MP3
Simple click on “Convert” button, then this program will start the Apple Music to MP3 conversion at once.
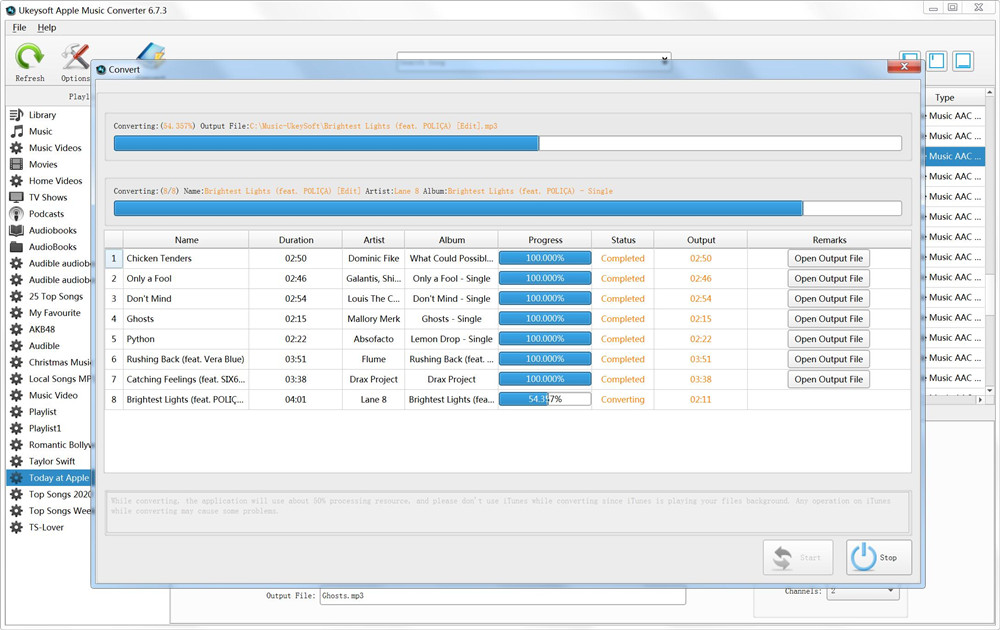
Note: During the conversion process, please don’t use your iTunes until it done!
When the conversion finished, you can check out the output folder to view your converted Apple Music tracks.
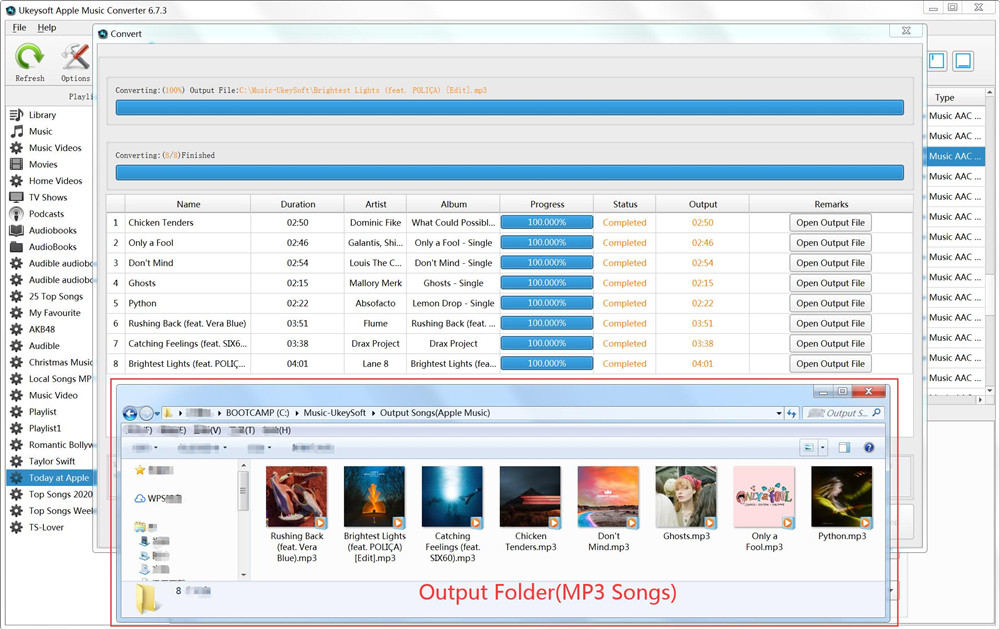
Step 5 Transfer Apple Music Songs to iPod Nano/iPod Shuffle/iPod Classic
Transfer Apple Music to iPod Without Using iTunes
If you want to transfer or copy Apple Music tracks to iPod Nano/Shuffle, there is an easier way to help you do this with one click without iTunes. All you need to do is installing the iOS Data Manager on your computer, with which you can transfer or copy music, pictures, videos, apps and more to iPod touch from computer without using iTunes.
Step 1. Launch iOS Data Manager on a computer and connect your iPod device to PC.
Step 2. Go to the “Music” tab, click on the import icon from the toolbar, then you can transfer music from your computer to iPod by clicking on “Add File” or “Add Folder” option.
Step 3. You are allowed to browse through your computer, just select your desired folder and press “OK”.

Transfer Apple Music to iPod With iTunes
If you prefer to use iTunes, here is a step-by-step guide for using iTunes to transfer Apple Music to iPod.
Step 1. Launch iTunes and open the folder where the DRM-free Apple music songs in MP3 format are saved then copy converted Apple Music songs to your iTunes library folder on computer.
Step 2. Connect your iPod nano/shuffle/classic with iTunes.
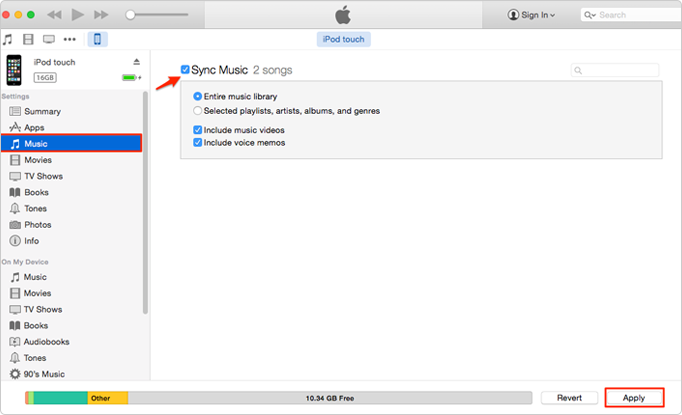
Step 3. Click on “Music” > “Sync Music” > “selected playlists, artists, albums, and genres”. In “Playlists” section, choose “Recently added” which includes MP3 Apple Music songs that you put in iTunes library. Tap on “Apply” and iTunes will automatically sync the Apple Music songs to your iPods as expected.
Solution 2: How to Record Apple Music to MP3 by Yourself
Screen Recorder is a professional screen capture tool that helps you easily record screen activity, online video, streaming audio and games with high output quality. It is an excellent streaming music recording software for recording Apple Music, Spotify streaming music, YouTube videos to MP3, AAC, WMA formats.
Step 1. Run Screen Recorder on Your Computer
First, install the Screen Recorder software to your computer. And you will get this home screen after running.

Please select “Audio Recorder” option if you want to record Apple Music to MP3.

Step 2. Turn on System Sound
To record beautiful music, you should turn on the System Sound and turn off the Microphone.

Step 3. Select MP3 Format
You can click on “More Settings” to set the recording file format and the output folder. Your M4P Apple Music tracks can be recorded as MP3, WMA, MA4 and AAC format. Of course, MP3 is recommended.

Step 4. Start Recording Your Apple Music Songs
Once you have completed all the settings, go to the Apple Music song and click the “REC” button right away. The music recording will start after 3-2-1 seconds.
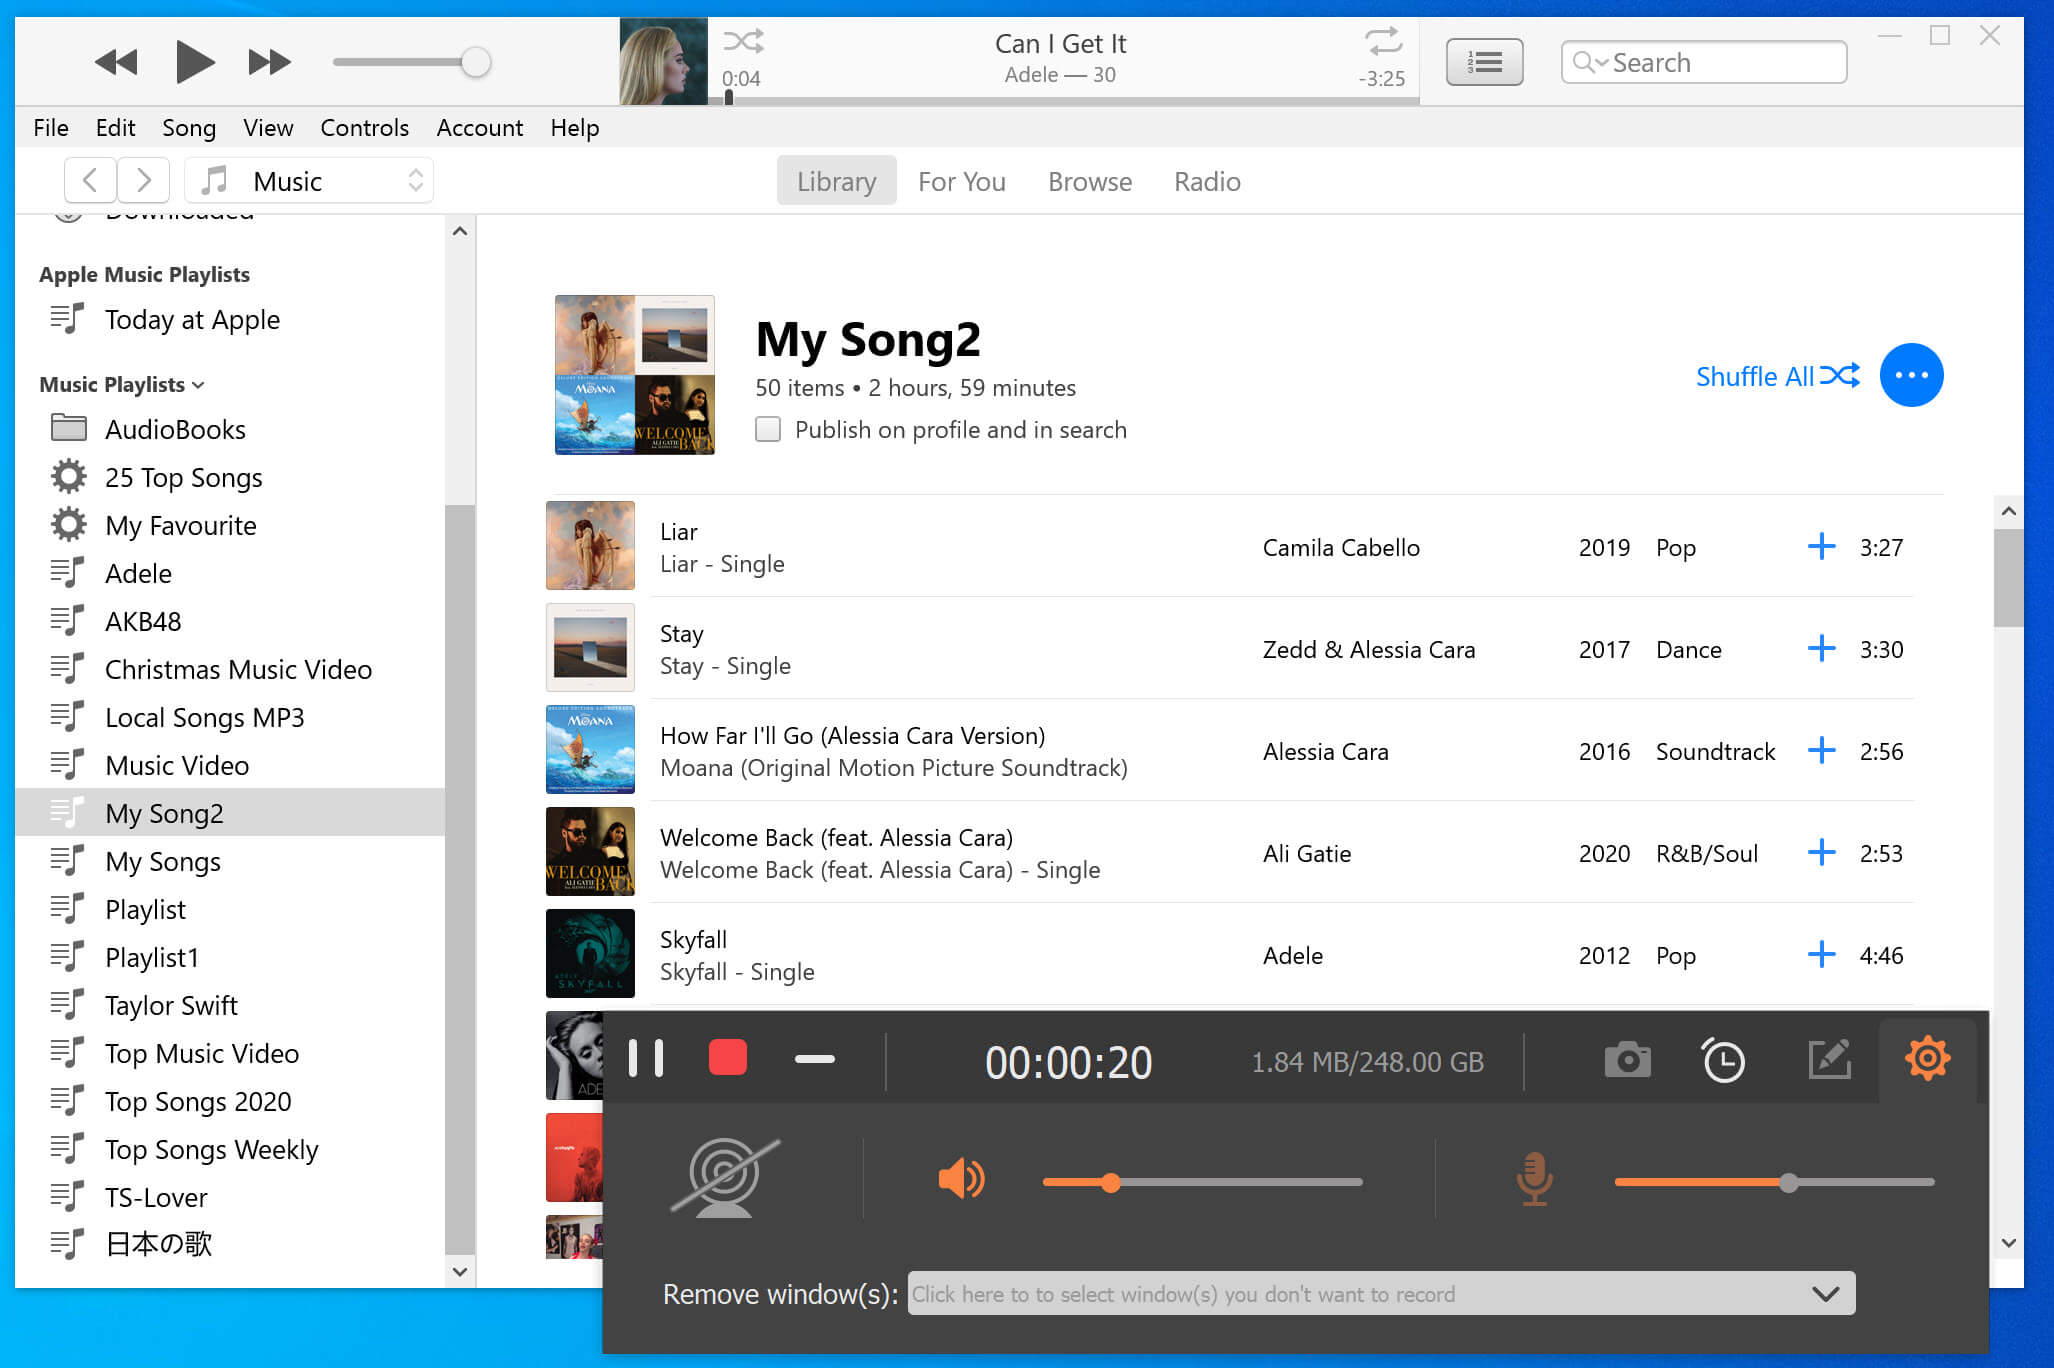
You can listen to the recorded song by clicking the “Play” button. If you are happy with them, simply click the “Save” button to save the audio.

The recorded Apple Music streaming music is saved on your computer and you can also find it in the recording library and rename it. It is easy for you to listen to Apple Music songs without downloading. Now trasnferring the recorded Apple Music songs to iPod Nano/iPod Shuffle as in Method 1 Step 5.

Note:
If you want Apple Music tracks in MP3 format to be of no quality damage, you are advised to choose Apple Music Converter. Assuming you have a lot of Apple Music streaming music you want to keep, Apple Music Converter software still has an advantage.
Related Article
Comments
Prompt: you need to log in before you can comment.
No account yet. Please click here to register.

- Save Downloaded Apple Music Forever
- Apple Music DRM Removal
- Convert Apple Music Songs to MP3
- Convert iTunes M4P to MP3
- Play Apple Music without Subscription
- iTunes Music DRM Removal
- Play Apple Music on Any Devices
- Keep Apple Music Forever
- Play Apple Music on iPod nano/shuffle
- Play Apple Music on MP3 player
- iPod Won't Sync Apple Music
- Play Apple Music on Samsung
- Transfer Apple Music to iPhone
- Sync Apple Music to Android
- Burn Apple Music Songs to CD
- Set Apple Music Song as Ringtone

I have an iPod nano that I haven’t used for a long time. But now I often use it to listen to my favorite Apple music offline while exercising. The program is used to convert Apple Music to DRM-free MP3!