
Remove Apple Music DRM protection; Convert Apple Music to MP3, M4A,etc.

Download Spotify Music without premium; Convert Spotify Music to MP3.

Download Music from Tidal to your Computer; Convert Tidal Music to to MP3, M4A,etc.

Download Amazon Music Prime/Unlimited/HD; Convert Amazon Music to MP3.
How to Transfer Music between iTunes and Windows Media Player
By Sarah ConnorUpdated on June 11, 2018
- Summary:
Here are the best ways to transfer music between iTunes and windows media player, play Apple Music & Spotify Music on Windows Media Player with easy steps.
To Sum Up: For users who prefer using iTunes and Windows Media Player at the same time, here comes the question: How can I freely share media files like music songs between these two services? This post is aiming to show you the best ways to transfer music between iTunes and Windows media player without hassle.
For Apple users, iTunes is not a strange thing. iTunes library allows iOS device users to freely enjoy music songs, and share music from iDevice like iPhone to other devices without any limitations. Besides, It could help to sync music files with iOS device conveniently. Apart from iTunes library, some music fans who prefer using Windows Media Player to play music for entertainment. Windows media player is a common media player. It is developed by Microsoft, it is widely used for playing audio, video and viewing images on PC with Microsoft OS and mobile devices based on Windows. A common issue that arises is figuring out how to transfer media files like music between these two platforms, so that music fans can freely enjoy songs on Windows devices or iOS devices.
Part A. Export Music from Windows Media Player to iTunes
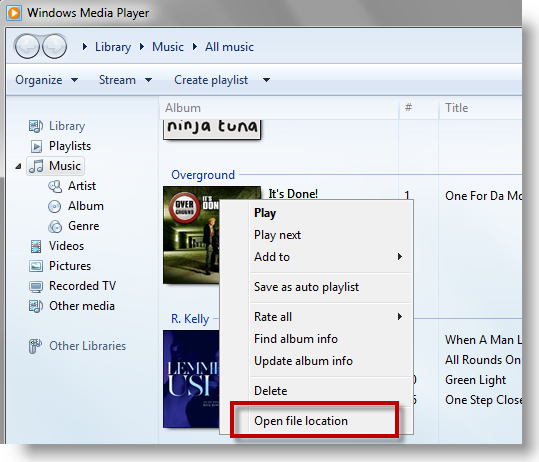
Step 1. Browse to your Windows Media Player music folder, which can be found by: Right click on the songs > Open file location:
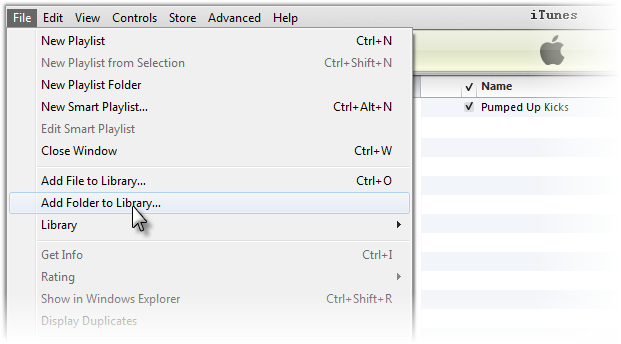
Step 2. Open iTunes > File > Add Folder to iTunes > Follow the same directory as where Windows Media Player saved the music:
Part B. Import iTunes Playlist to Windows Media Player
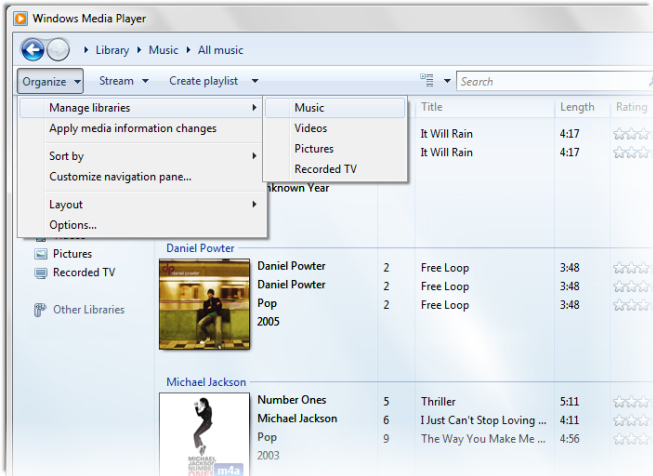
Step 1. Open Windows Media Player > Organize > Manage libraries > Music:
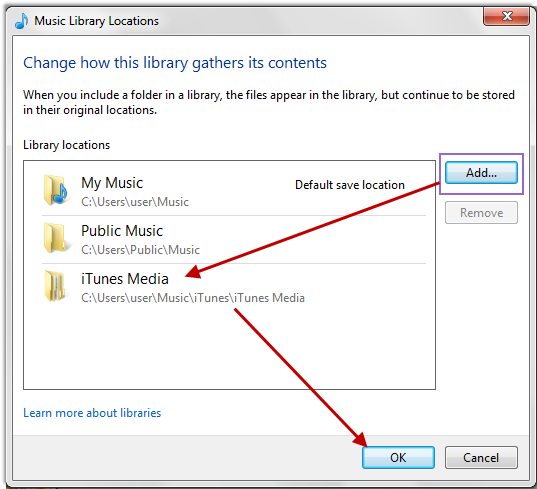
Step 2. Click Add to browse the file folder location of your iTunes library. And Click OK.
Part C. Play Apple Music Songs via Windows Media Player
Since media files be play on the windows media player is WMA format. However, Apple Music encodes unique M4P format for preventing them from being opened by another media player. Thus, if you want to transfer and play Apple Music including iTunes music on Windows Media Player, it is necessary to convert the protected audio to a common format that Windows Media Player is capable of reading such as MP3. In other words, once the DRM is removed from Apple Music streams, you can easily play the songs on any player as you like including Windows Media Player.
Thanks to Apple Music Converter, you can transfer Apple Music to Windows Media Player and play Apple Music songs via Windows Media player without limits. As its name, it is a famous music converter designed to remove DRM from Apple Music, convert M4P music files to DRM-free files with its original quality, such as, MP3, AAC, WAV, FLAC, etc,. that are compatible with Windows Media Player and other media players. After the conversion, you can play back the converted Apple Music on any compatible mobile device without iTunes/Apple Music app.
How to Play Apple Music with Windows Media Players
Step 1 Launch Apple Music Converter
Make sure the latest iTunes is installed on your computer and then launch the Apple Music Converter program.
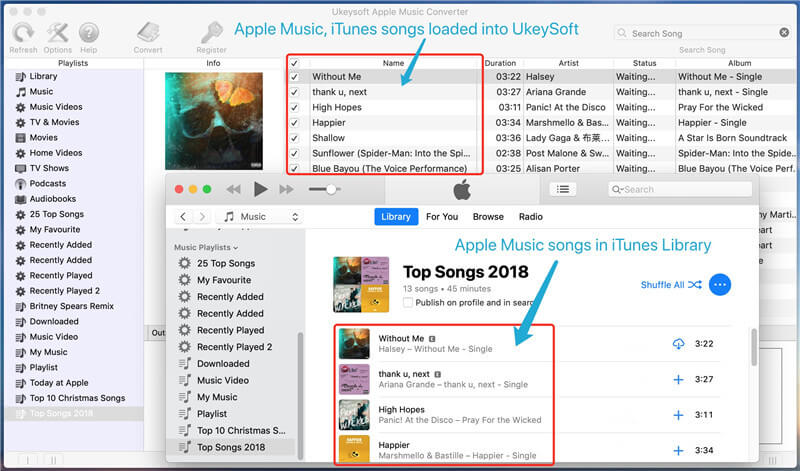
Step 2 Add Apple Music Songs
Now select the Apple Music songs you want to play on Windows Media Player after opening the relevant playlist. Note: you can add multiple songs at once to save time.

Step 3 Output Format Settings
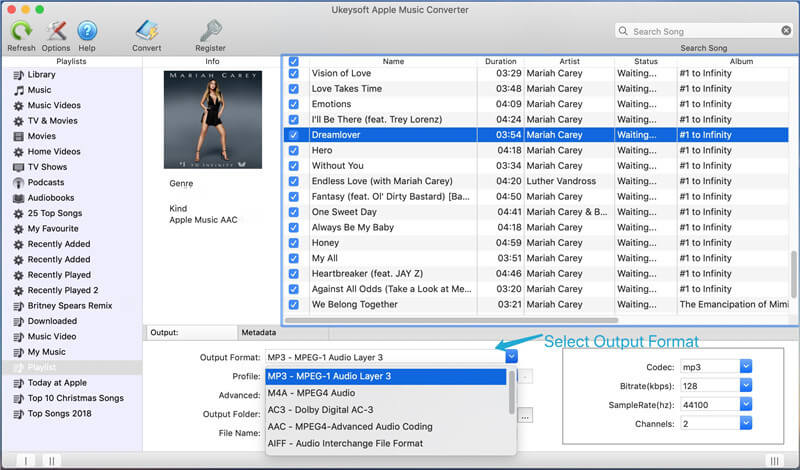
On the bottom of the main interface, you can choose DRM-free output format from the drop-down format list. Normally selecting “MP3” since it is the most common media files compatible with most of media player including Windows Media Player. Afterword, you can customize the output folder and output settings.
Step 4 Convert Apple Music to DRM-free MP3
Once you have done all settings, you can click the “Convert” button to start converting Apple music to DRM-free MP3 format.

Step 5 Sync Apple Music Songs to Windows Media Player
Finally the converted Apple Music is DRM-free, you can to import them to Windows Media Player.
Part D. Enjoy Spotify Music with Windows Media Player
As we all know, Spotify, the undisputed king in the current market of streaming music. Spotify Music is DRM-protected, which prevents us streaming Spotify songs to other devices. Thus to play Spotify songs on Windows Media Player, the first thing we need to do is to remove DRM from Spotify Music. How can we make it? The best Spotify DRM removal tool, Spotify Music Converter will give you a big help.
Spotify Music Converter is specially designed for removing the DRM from Spotify Music. It can convert Spotify songs to DRM-free formats including MP3, M4A, WAV and FLAC with 100% audio quality and ID tags kept. With this excellent Spotify Music Converter, you can simply play Spotify songs anywhere on any devices in any time, including freely playing the converted Spotify Music on Windows Media Player. Additionally, you could offline listen to Spotify Music without paying; burn Spotify Music to CD, enjoy them outside Spotify app and web player.
How to Play Spotify Music with Windows Media Player
Step 1.Run Spotify Music Converter
Download, install and run Spotify Music Converter on your Mac or Windows computer. The interface is shown as below:

Step 2.Add Spotify Music
You can now drag&drop songs, albums, playlists or artists from Spotify app to the interface directly. Or copy&paste the link of the song, album, playlist or artist to the bottom input area. Spotify Music Converter will automatically load all songs contained in the album or playlist.

Click “Add” and you will see all Spotify songs on the program interface.

Step 3.Choose MP3 as Output Format
On the bottom of the main interface, you can choose DRM-free output format from the drop-down format list. Normally selecting “MP3” since it is the most common media files compatible with most of media player including Windows Media Player. The default format is MP3. Click Options icon if you want to choose other output formats(M4A, WAV or FLAC). You can also set bitrate and samplerate. Click General tab if you want to change output folder.

Step 4.Convert Spotify Music to DRM-free MP3
Click “Convert” icon to start removing Spotify DRM and convert music to the format you choose. After conversion, you will get the DRM-free music as local music files.

Step 5. Sync Music to Windows Media Player
After conversion done, you can find the converted music files and import them to Windows Media Player to enjoy.
Related Article
Comments
Prompt: you need to log in before you can comment.
No account yet. Please click here to register.

- Save Downloaded Apple Music Forever
- Apple Music DRM Removal
- Convert Apple Music Songs to MP3
- Convert iTunes M4P to MP3
- Play Apple Music without Subscription
- iTunes Music DRM Removal
- Play Apple Music on Any Devices
- Keep Apple Music Forever
- Play Apple Music on iPod nano/shuffle
- Play Apple Music on MP3 player
- iPod Won't Sync Apple Music
- Play Apple Music on Samsung
- Transfer Apple Music to iPhone
- Sync Apple Music to Android
- Burn Apple Music Songs to CD
- Set Apple Music Song as Ringtone


No comment yet. Say something...