
Remove Apple Music DRM protection; Convert Apple Music to MP3, M4A,etc.

Download Spotify Music without premium; Convert Spotify Music to MP3.

Download Music from Tidal to your Computer; Convert Tidal Music to to MP3, M4A,etc.

Download Amazon Music Prime/Unlimited/HD; Convert Amazon Music to MP3.
How to Transfer iTunes Music to USB Drive or Flash Drive
By Sarah ConnorUpdated on July 04, 2022
- Summary:
Do you want to transfer music from iTunes to USB flash drive/external drive for backup? Want to copy iTunes songs to USB drive for listening in Car? This guide will show you two efficient ways to transfer music(M4P songs included) from iTunes to USB flash drive or external hard drive, the best way is to convert iTunes songs to MP3 and transfer them to USB drive.
Question: “I have some purchased songs in iTunes library, they are 256kbps AAC format. How do I copy iTunes music to a USB drive to play in my car? By the way, can I transfer Apple Music to USB drive?” – Brandon
iTunes keeps your media files like Apple Music, movies, songs, ringtones, and playlists, and it is the default software to deal with your music on iPhone/iPad/iPod. Since all iPhone/iPad can be synced with just a single iTunes library, if you want to change a new computer,you need to rebuild the whole music library, so you may need to export music from iTunes to USB or Flash Drive for backup. Sometimes, you may want to listen to iTunes music outside without iTunes, like MP3 player, iPod nano, car media, USB mobile speaker. However, how to export iTunes music and Apple Music M4P songs as MP3? If you want to take music out of iTunes library or transfer music from iTunes to USB flash drive, the best way is to convert iTunes music to MP3 firstly, then you can enjoy and use iTunes music freely.
CONTENTS:
Preparation: Convert iTunes Songs to MP3 for USB Drive
It is generally known that USB drive only supports DRM-free MP3 audio format. Whether you want to transfer purchased iTunes AAC songs or local WAV songs to USB drive, you need to convert them into MP3 audio files. Follow these steps to convert iTunes songs/WAV audios to MP3:
Note: If you have songs purchased from iTunes Store before April 2009, they were encrypted by Apple FairPlay DRM. So you need to remove DRM first, and then convert them to DRM-free MP3 files. Please turn to Method 4.
Step 1. Launch iTunes on PC, click “Edit” tab on menu (or the “iTunes” tab if on a Mac).
Step 2. Select the “Preferences” option > “General” > “Import Settings”.
Step 3. Select “MP3 Encoder” from the “Import Using” option, then click “OK” to save your changes and return to the iTunes library.
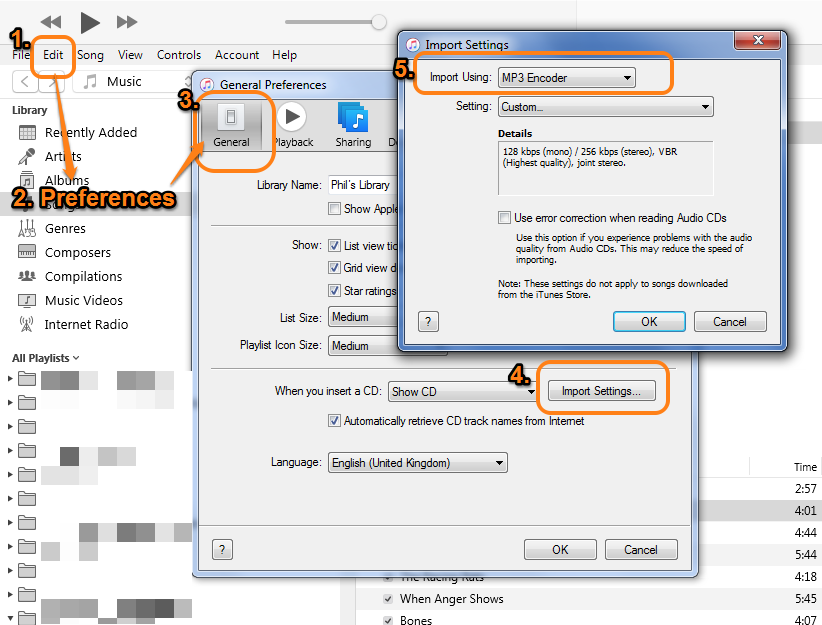
Step 4. Choose the songs or audios in iTunes library that you want to convert, then click “File” > “Convert” > “Create MP3 Version”.
When finished, all these songs will be exported to MP3 files in your iTunes library. This means you can copy these MP3 audios from iTunes to USB flash for playback or backup.
Method 1: How to Transfer Music from iTunes to USB Drive Directly
iTunes is a good place to manage music, actually, users can directly transfer music from iTunes library to USB or flash drive, but you can’t directly transfer Apple Music songs from iTunes to USB drive or other external hard drive. If you have saved the non-copyright protected songs in the iTunes library, you can follow the detailed steps below to transfer music from iTunes to flash drive, this method works for both Mac and Windows computer.
Step 1. Run the iTunes on the computer and find the music or playlists that you want to transfer.
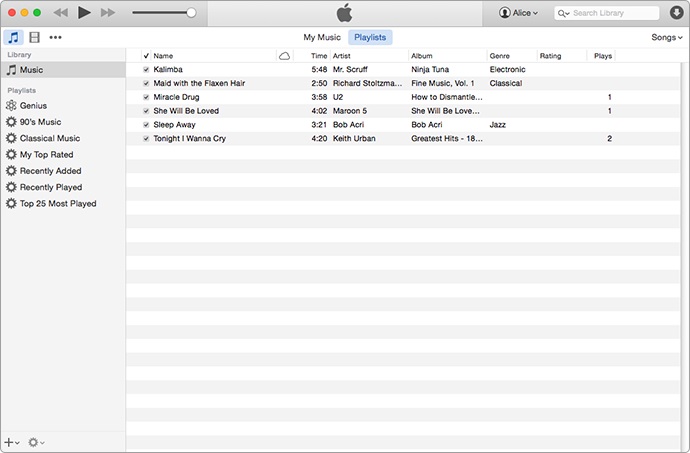
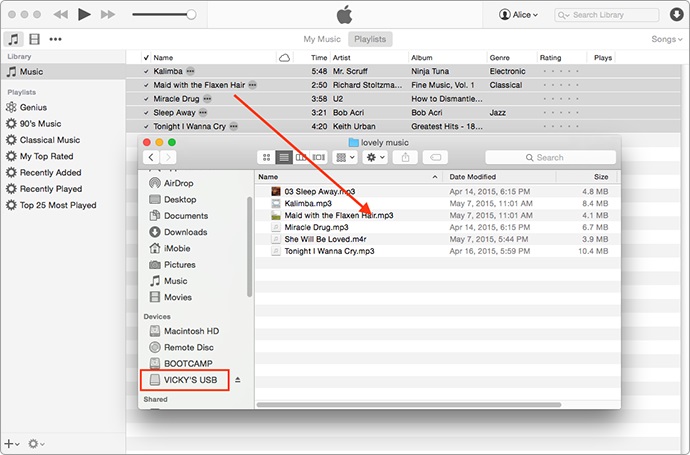
Step 2. Plug your USB drive or flash drive to the computer, then open the folder of your USB flash drive.
Step 3. On the iTunes library, please select the music that you want to transfer to USB flash drive and then drag them to USB drive.
Method 2: Copy iTunes Music from Stored Folder to USB or Flash Drive Directly
Besides the above free method to use iTunes to transfer music to USB or flash drive, users could open the folder where the songs are stored, then directly drag and drop them to the USB flash device. The most important thing is how to find the storage path of iTunes songs, please follow the steps below to find and open the storage folder of the iTunes music and transfer songs from computer to flash drive.
Step 1. Open the iTunes on the computer and find the music you want to transfer.
Step 2. Right click a songs and click “Song Info”
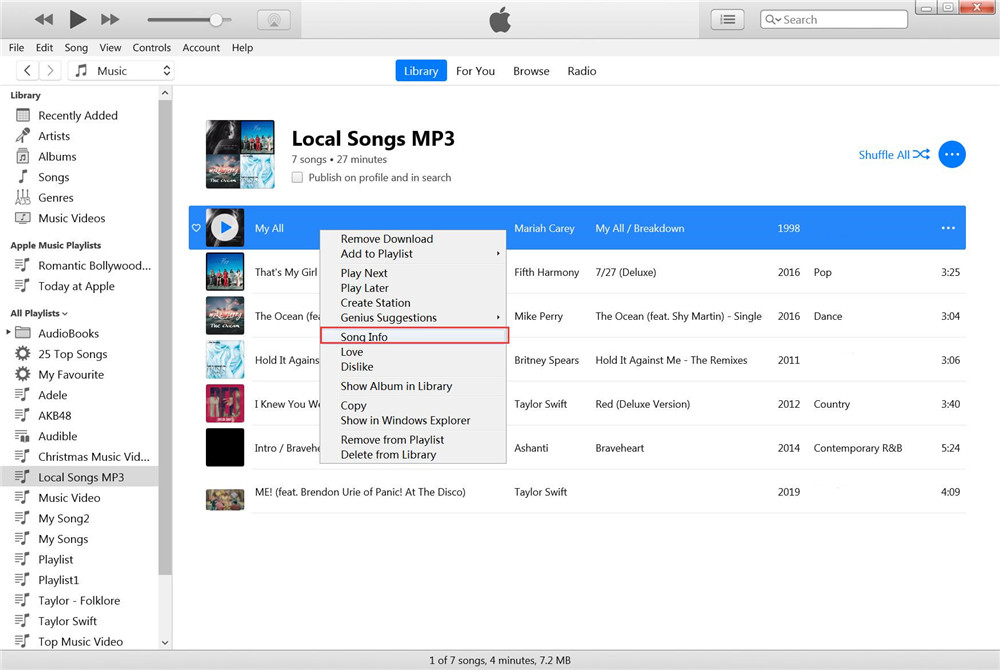
Step 3. Click “File” menu, at the bottom of the information windows, you will see the location item
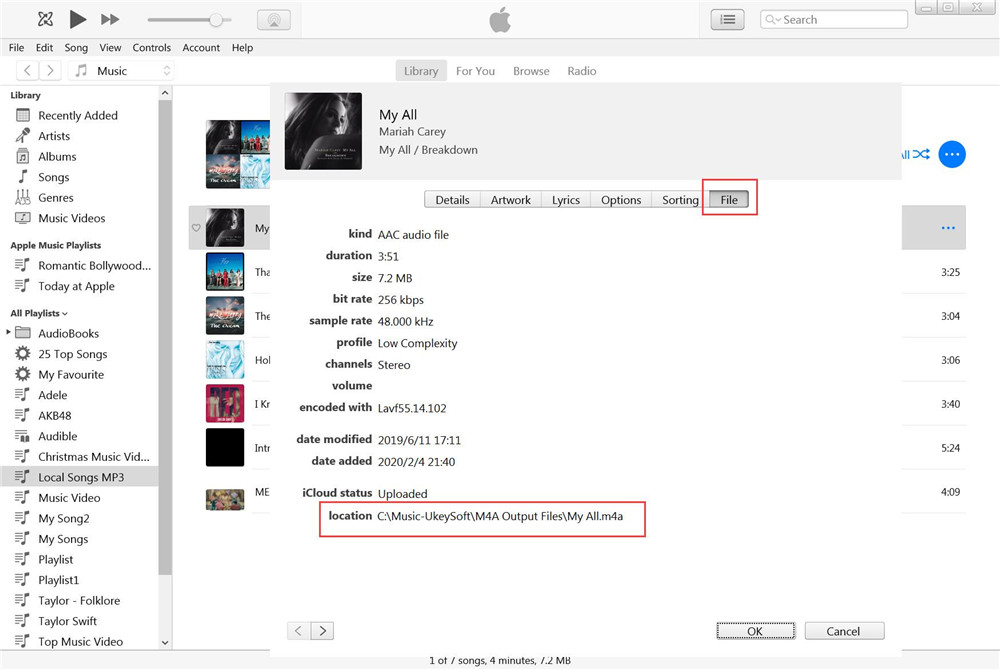
Step 4. Then, follow this path to open the storage path, you could find the music save onto the folder, then copy or drag them to USB drive.
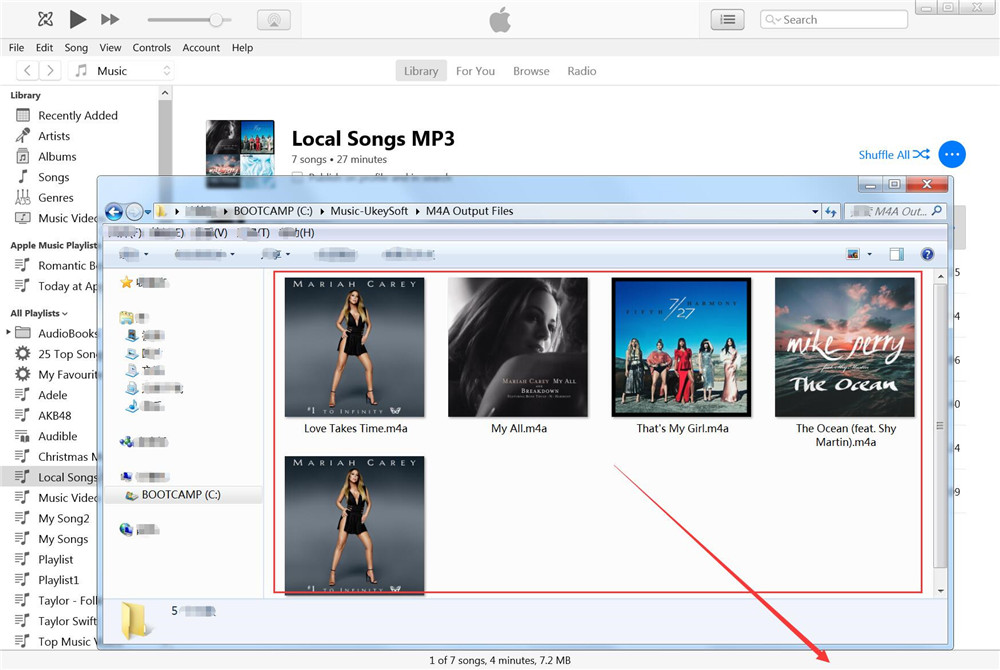
For Apple Music AAC audio file: Generally, the Apple Music songs you download are stored in this path
Location: C:\Users\[your compuer name]\Music\iTunes\iTunes Media\Apple Music
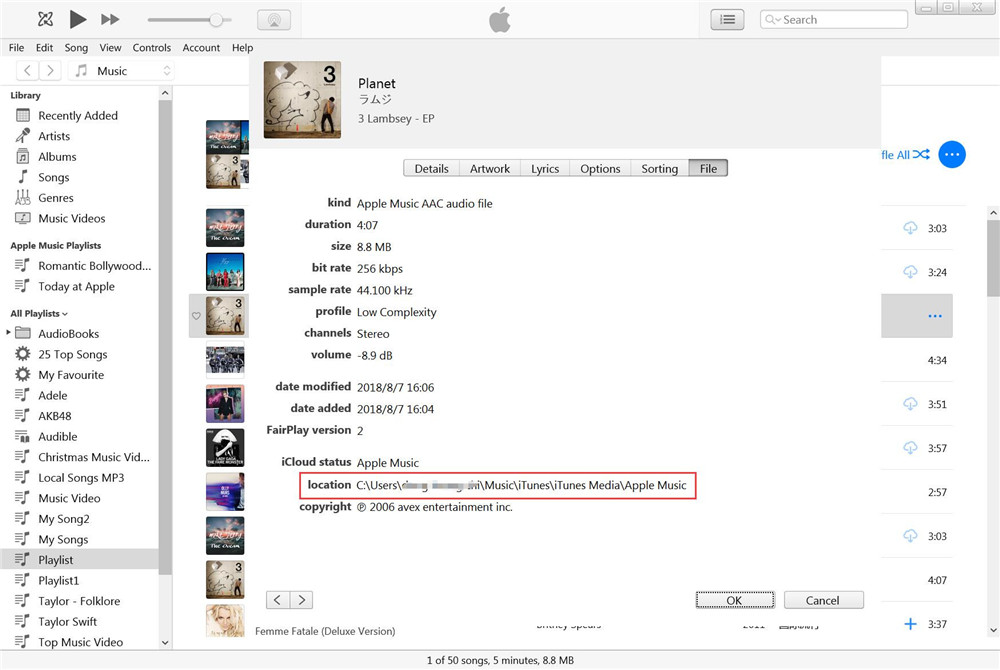
When you add Apple Music songs to iTunes library, you will find the kind of the songs is Apple Music AAC audio file. When you download Apple Music songs to the local drive, you will find the downloaded songs are DRM protected M4P file, so the Apple Music songs can’t be copied or transferred directly.
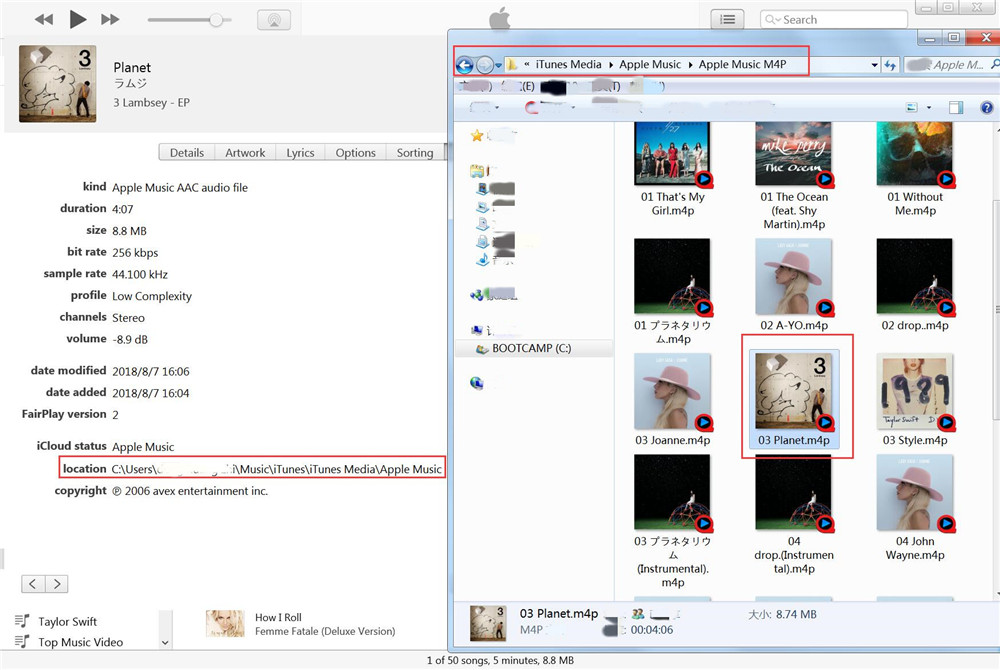
If you want to transfer Apple Music from iTunes to USB flash drive or non-apple devices, you need to remove DRM from Apple Music, please keep reading the Method 4.
Method 2: Transfer Music from iTunes to USB/Flash Drive with iTunes Transfer
iTunes Transfer also is an iPhone iPad Manager tool,which not only can help you move music, photos, videos between iDevice and PC/external hard drive/iTunes freely without data loss,but also enables you transferring music/video to iPhone,iPad and iPod directly,during the transferring process,it will change automatically those formats which are incompatible with compatible ones.So you can use this iTunes Transfer to transfer music from iTunes to iPhone,then export music from iPhone to computer, to iTunes or to USB directly.
Part 1.Transfer iTunes Music to iPhone
Step 1.Run the Program and Connect iPhone to PC
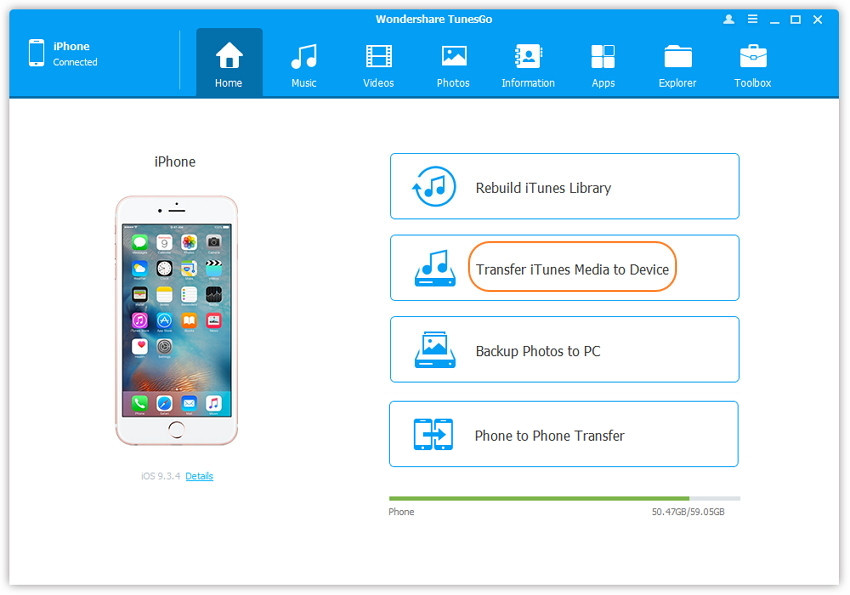
First of all,please download and run the iTunes Transfer on the computer,then connect your iPhone device with the computer. Then click “Transfer iTunes Media to Device” icon on the main interface.
Step 2.Select Music Contents in iTunes
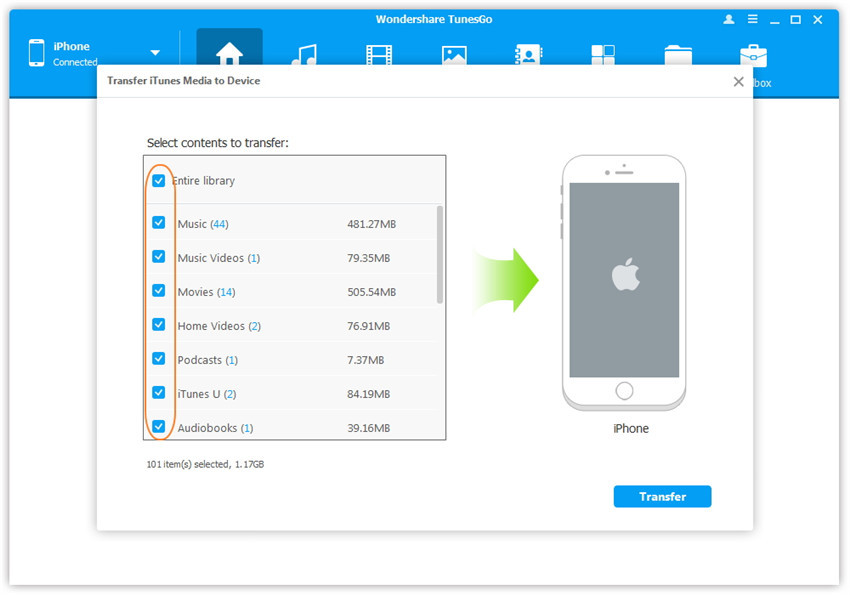
The program will detect all the media files in iTunes and show them by list on the pop-up window. By default, the entire library has been checked. But you can uncheck some items that you won’t transfer to your iDevice.
Step 3.Transfer Music from iTunes to iPhone
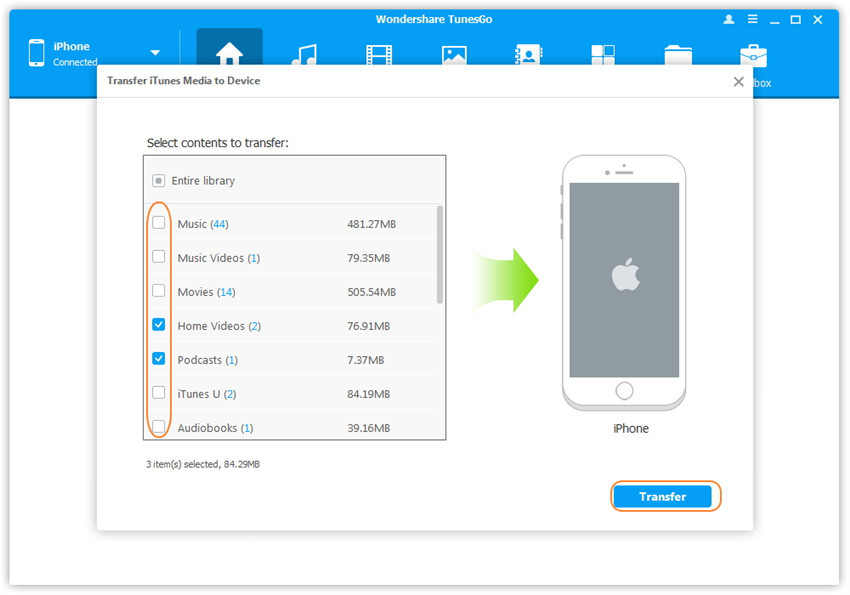
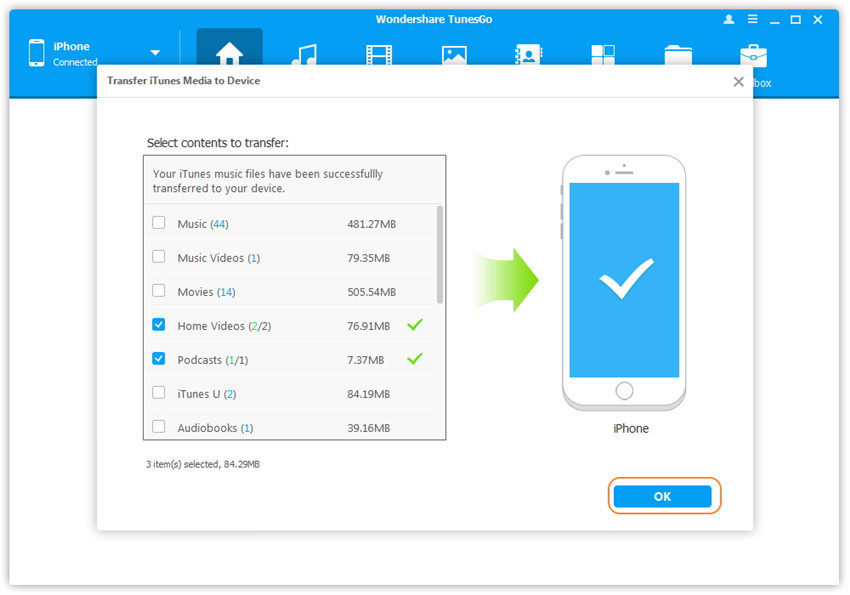
Click “Transfer” to start transferring selected music files to your iPhone and then click OK to complete the process.
Note: There is no worry about duplicate files as TunesGo – iTunes Transfer enables to automatically detect the duplicates and only transfer the exclusive contents from iTunes to iDevice.
Part 2: Transfer Music from iPhone to USB or Flash Drive
The TunesGo iTunes Transfer also can help you to back up music and other audio files from your iPhone, iPad or iPod to the computer easily, including Music, iTunes U,Podcasts,Ringtone,Audiobooks.So you can quick to export music from iPhone to USB or flash drive.
Step 1.Run the Program and Connect iPhone and USB Drive to PC
Launch TunesGo iTunes Transfer and connect your iPhone and USB Drive with the computer.
Step 2.Export Music from iPhone to USB Drive
Click on Music tab. Select the music you wish to transfer and then click Export > Export to PC > Choose your flash drive > Click Select Folder button to transfer.

Well done,all iTunes music be moved to the USB or Flash Drive for backup,if you want to play iTunes Music in a Car,you can plug your USB drive into the car player and start listening iTunes Music songs in your car.
Read More: How to Transfer Apple Music to USB Drive
Method 4: Transfer Apple Music/iTunes Music to USB Drive (Recommended)
If you want to transfer protected iTunes M4P songs(Apple Music) to USB drive or SD Card for listening on other media players, you need to convert DRM protected M4P songs to MP3 at first, then transfer them to USB/Flash Drive, SD card or Android phone for listening. Because iTunes M4P file is a file extension for a protected audio file encoded with advanced audio codec (AAC), which is a lossy compression. That means, Apple iTunes purchased song are in .m4p format, which protected by Apples Fairplay DRM. That’s why people only can open it with iTunes and not able to play M4P on MP3 player or other non-Apple devices.
Part 1: Convert Apple Music/iTunes M4P Music to MP3
The UkeySoft Apple Music Converter and TunesBank Apple Music Converter, both also is an iTunes Music Converter and M4P to MP3 Converter, which not only can help you remove DRM from Apple Music, but also can converts copyrighted iTunes M4P songs to MP3/ M4A/ AC3/ AIFF/ AU/ MKA/ FLAC/ M4R with 16X conversion speed. Then you can play iTunes purchased songs anywhere with high quality preserved. The following part will show you how to convert iTunes music in to DRM-free MP3 audio files.
Key Features:
-Convert iTunes M4P Songs to MP3, WAV, M4A, FLAC, etc.
-Remove DRM from Apple Music songs, playlist and albums.
-Remove DRM from iTunes audiobooks and Audible audiobook.
-Convert Audible AAX, AAX+, AA files to MP3, M4A, etc.
-Convert iTunes M4B audiobook to MP3, M4A, FLAC, AAC, AC3, AU, AIFF, etc.
-Convert and transfer audiobooks from iTunes to USB or flash drive directly.
-Extract audio from iTunes videos.
If you are a Mac user, TunesBank Apple Music Converter(Mac) is a beterr choice, it can help you convert Apple Music and iTunes songs in 5X faster speed, which is faster than any Apple music converter on the market. In addition, you can add more Apple Music, iTunes songs and video to the “Converting” list during converting process, only this brand can do that!
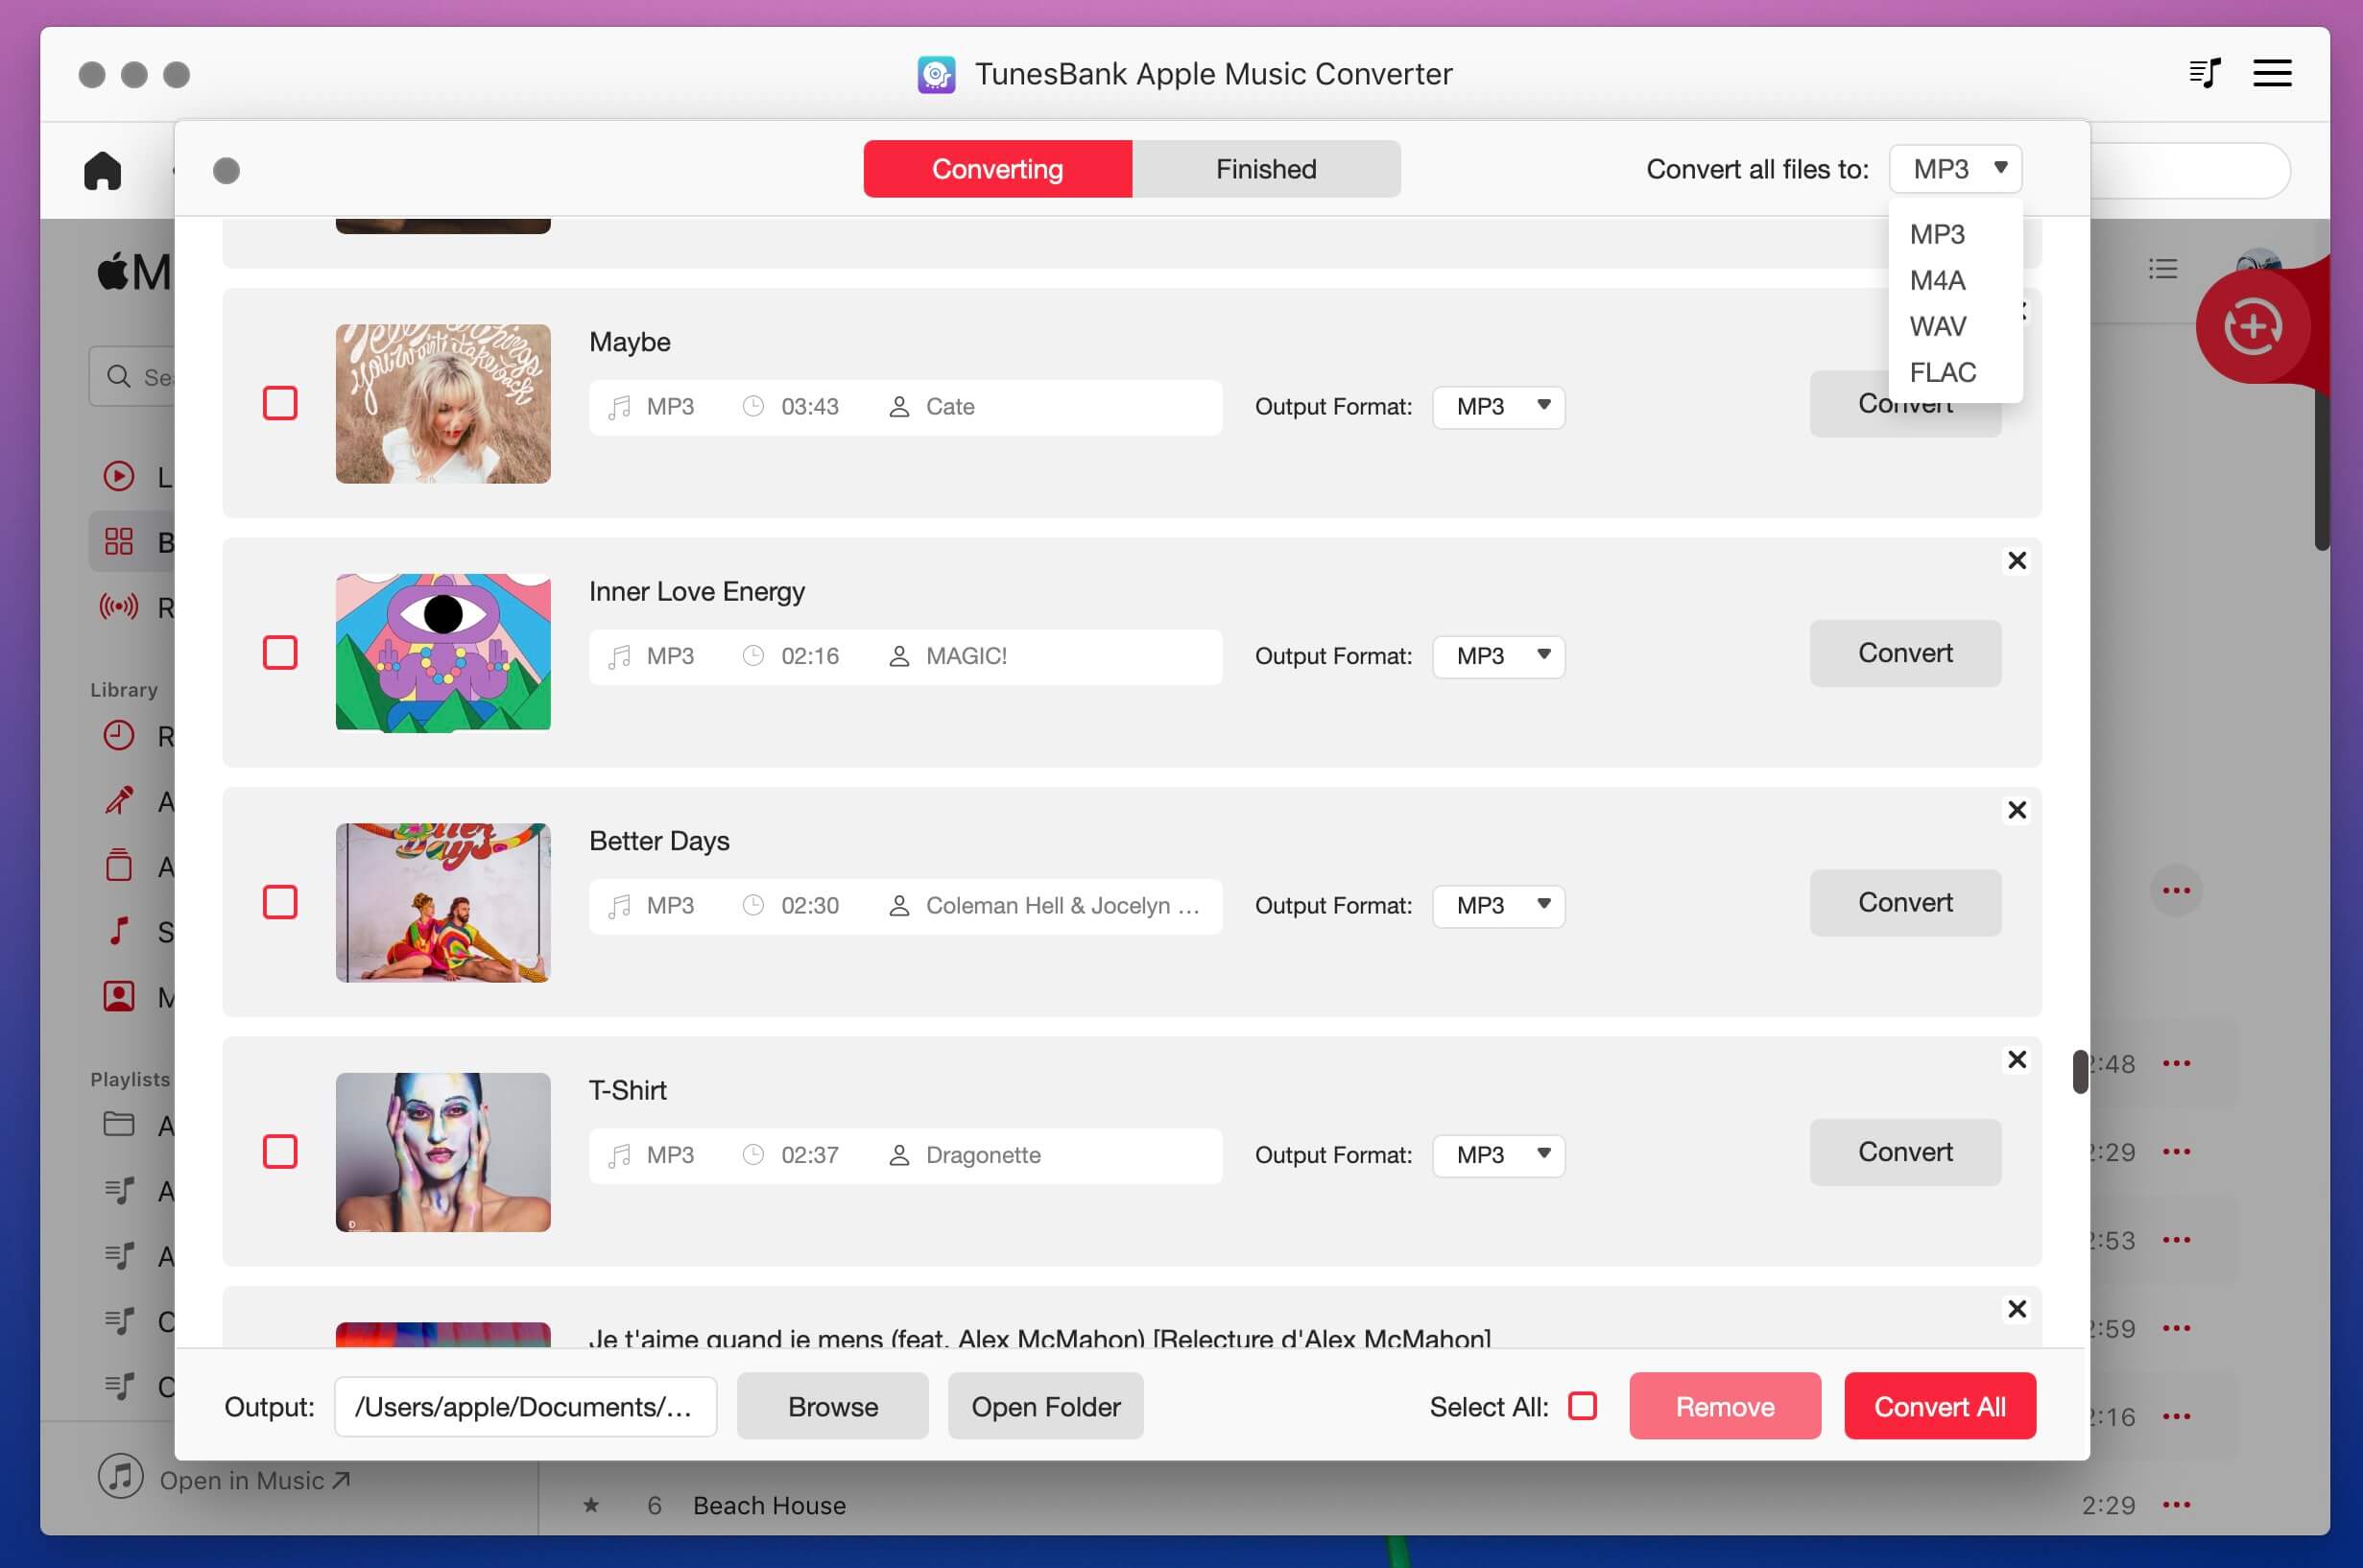
Step 1.Install Apple Music Converter on PC or Mac
Install the Apple Music Converter program to your computer and launch it. We also provides the Apple Music Converter for Mac version.Then iTunes will be automatically launched at the same time,and a whole iTunes library will be loads into the program.
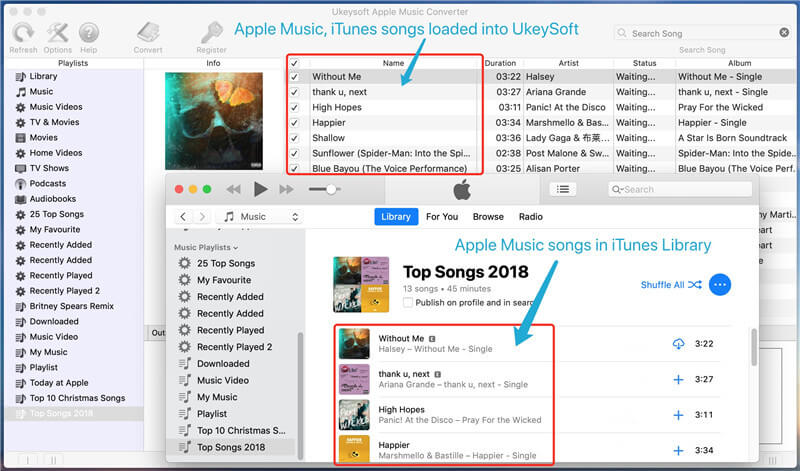
Step 2.Select iTunes M4P Music Songs
Choose iTunes music from the left iTunes playlist column,check the ones that you want to convert to MP3.

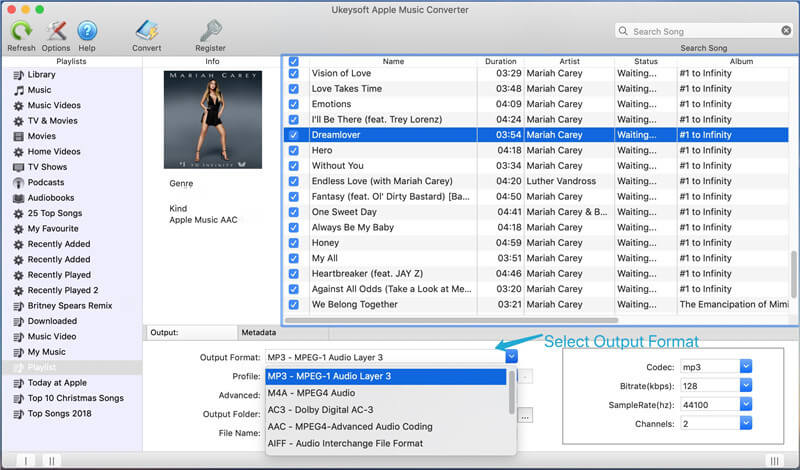
Step 3.Choose MP3 as Output Format
You can find the “Output Settings” at the bottom of interface. At there, you can select “Output Format”. Choose “MP3” as output format,you can also convert iTunes Music M4P songs to MP3, M4A, AC3, AAC, AIFF, AU, FLAC, M4R and MKA. Select the format you want.
Step 4.Begin Convert iTunes M4P Music to MP3
Click “Start Convert” button to start converting selected iTunes music to MP3. After conversion, locate the songs and transfer them to the USB/Flash Drive.

Part 2: Transfer the Converted Apple Music to USB Drive
If you want to play Apple Music in a Car without iPhone,you can transfer Apple Music to USB flash drive for listening through USB Flash drive,just plug the USB into your Mac/Windows computer, and copy the converted Apple Music songs to USB for enjoying in your car.If you want to play M4P on Android devices like Samsung S8, Huawei Mate 10, Huawei P20, and Google Pixel 2XL, etc,you can also transfer all converted Apple Music to other non-Apple devices for enjoying without Apple Music app.
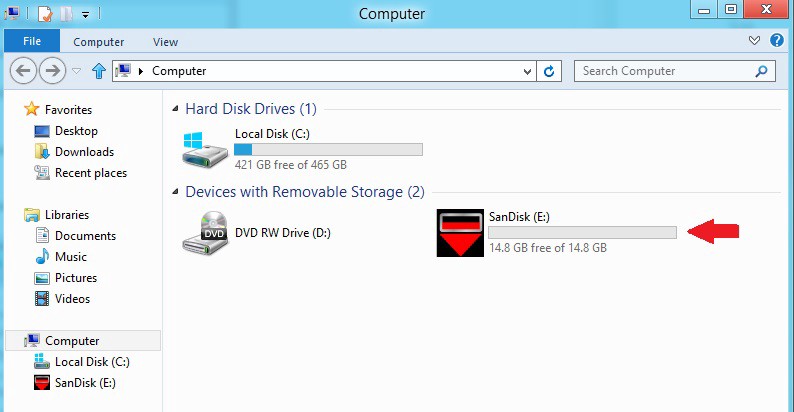
Benefits: Transfer iTunes Videos/Movies to USB Flash Drive
If you have DRM-free MP4 videos, movies in your iTunes library, then you can also transfer them to a USB drive for backup or playback.
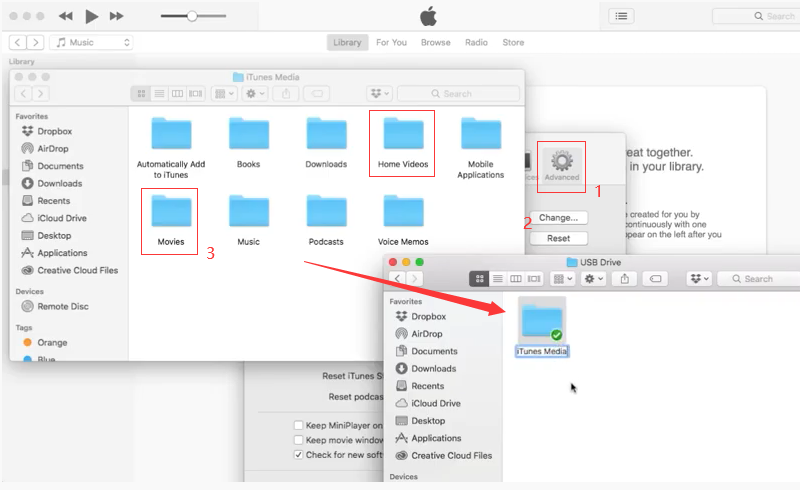
Step 1. Plug the USB drive to computer. Launch iTunes and navigate to the Preferences.
● On a Mac, go to the iTunes menu and select “Preferences”.
● On Windows, go to the Edit menu and select “Preferences”.
Step 2. Select “Advaced”, copy the output path under the “iTunes Media folder location”.
Step 3. Open the search bar by keyboard, and then paste the copied path to the field.
● On Mac, use the Command + Space keyboard shortcut to open the Spotlight Search.
● On Windows, press Win+R on your keyboard to launch the Run command window.
Step 4. You’ll see storage folders for iTunes videos, movies, music, downloads, and more. Choose “Home Videos” or “Movies”, drag & drop them to the USB drive.
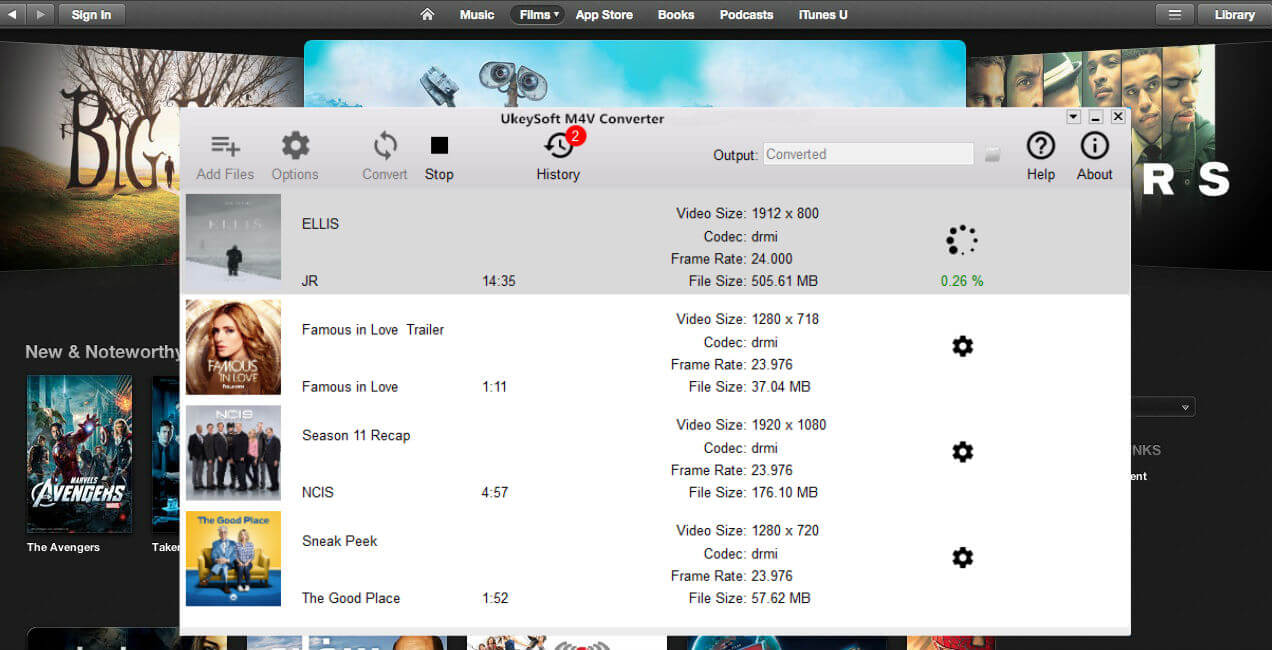
Tips: For DRM-protected iTunes M4V movies and TV shows, you can rely on this powerful UkeySoft M4V Converter. It assists users to convert iTunes M4V Movies/TV Shows to MP4 at high speed with original quality. After which you can directly transfer and copy the converted iTunes video files to USB drive.
Related Article
Comments
Prompt: you need to log in before you can comment.
No account yet. Please click here to register.
- Sync iTunes Media to Android
- Sync Music from iTunes to iPhone X/8/7/6S
- Transfer iTunes Video to Galaxy S9
- Transfer iTunes Music to Samsung
- iTunes Videos to Android
- Transfer iTunes Videos to Huawei
- Transfer Music from iTunes to USB Drive
- iTunes Playlists to Huawei Mate RS
- Sync iTunes Music to Huawei P20/P20 Pro


