
Remove Apple Music DRM protection; Convert Apple Music to MP3, M4A,etc.

Download Spotify Music without premium; Convert Spotify Music to MP3.
Download Music from Tidal to your Computer; Convert Tidal Music to to MP3, M4A,etc.
Download Amazon Music Prime/Unlimited/HD; Convert Amazon Music to MP3.
Two Best Way To Record A PowerPoint Presentation with Narration
By Sarah ConnorUpdated on August 19, 2018
- Summary:
Recording PowerPoint presentation with audio can make your presentation become more easier and doesn’t install the PowerPoint, to make your PowerPoint presentation video looks authenticity and more professional, you can record and save your webcam when practicing.
From classrooms to boardrooms, PowerPoint slides are the go-to medium for sharing supporting content that helps audiences absorb and connect with the concepts and ideas shared in a presentation. Experienced business professionals and educators will be the first to tell you that the most effective video presentations show not only your PowerPoint slides, but also you presenting. From eye contact to body language, showing the actual presentation makes the viewer feel like they are in the room — it will grab your viewer’s attention and improve comprehension and retention of your key points.
When it comes to recording employee training or other educational lectures, this method for recording a PowerPoint presentation is ultimately the best.

What you need before Recording A PowerPoint Presentation with Narration?
Are you ready to record pro narration for your PowerPoint presentation
Are you ready to record pro narration for your PowerPoint presentation? (graphic source)
In this tutorial, you’ll shows you two methods to record narration in PowerPoint. With an affordable microphone (or your computer’s built-in option), you can add the commentary your audience should hear and include it with the final PowerPoint presentation file.
Method 1: How to Quickly Record Narration in PowerPoint
Now let’s walk (step-by-step) through how to save PowerPoint 2013 as vdeo files, professionally record your narration while doing PowerPoint presentation on PC/Mac.
Step 1.Setup Your Microphone
Before you start to record audio inside PowerPoint, start off by making sure that your microphone is plugged in and ready to record. Whether you’re on Windows or macOS, you’ll want to access the audio device settings and set your default microphone.
You can’t change which device to record from or set volume levels for the microphone inside of PowerPoint, so make sure that it’s ready for recording before you dive into PowerPoint.
You can’t change the microphone settings inside of PowerPoint, so make sure you use the Windows or macOS settings to choose your mic and set levels before you start recording in PowerPoint.
Step 2.Press Record in PowerPoint
To record narrations in PowerPoint, start off by finding the Slide Show tab on PowerPoint’s ribbon. Click on the Slide Show tab to change the available options.
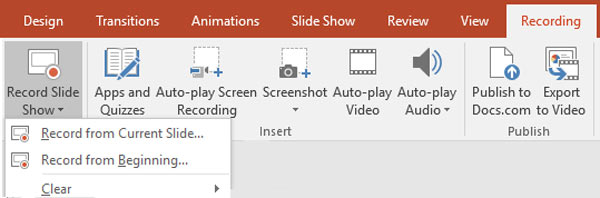
On the Slide Show tab, choose Record Slide Show to launch the recording options.
Make sure that you start on the first slide in PowerPoint to record audio and timings for the entire presentation.
Now, find the Record Slide Show button and click on it. A new window will pop up with two options to set before you start recording:
Slide and animation timings. Leave this option checked if you want to setup the timings for your slides. Basically, this option allows you to sync up your narration with slides. I recommend leaving it on.
Narrations, ink, and laser pointer. Definitely leave this option checked to record audio narrations, even if you don’t plant to use ink or the pointer to add illustrations.
Leave both of these options checked to record audio narrations and synchronize slide change timings.
Make sure you’re ready before you press Start Recording. As soon as you click on it, PowerPoint will begin to record your screen and audio.
Step 3.Start Recording Your Narration
Once you Start Recording, PowerPoint will go into a full screen presentation view. It also begins recording audio from your microphone.
In the upper left corner of the window, you’ll see a Recording window with a runtime counter and other buttons. Use this to keep track of the length of your presentation.
You can use the arrow keys on your keyboard to switch between slides while recording. Use the right arrow to jump to the next slide, or the left arrow to move to the previous PowerPoint slide.
While recording, you’ll see a window with the runtime of your current recording.
Note: We’re using the popular Simplicy PowerPoint template from GraphicRiver. Find more professional PowerPoint templates with great designs.
Basically, PowerPoint is recording exactly what’s on your screen along with the audio you speak into your microphone.
When you’re finished, click on the X button in the upper right corner of the Recording window to complete the audio recording.
It’s ideal if you have a dual monitor setup and you can use Presenter View, which puts a preview of your next slide with your speaking notes on a second screen. Turn on Presenter View on the Slideshow tab by checking Use Presenter View.
It’s great to have Presenter View on a second screen while you’re recording your narrations. You can use this to show your Speaker Notes and a preview of the next slide to keep you on pace.
Step 4.Use Annotations (Optional)
While you’re recording your presentation, you can also add annotations to your PowerPoint. You can use a digital pen, highlighter or laser pointer to add markings.
I love this feature when I’m gesturing toward something specific on the slide in my narration.
To use annotations, hover in the lower left corner of your presentation while recording the presentation. There are extra tools that you can choose from. For an annotation, click on the third icon of the left to choose from one of the tools.
In this example, I’ve circled the text logo to bring attention to it. Annotations work well in presentations as a way to focus the viewer’s attention.
After you select a tool, you can draw on the slide to add the annotation. It doesn’t change the original slide, but it does add it to the recorded version of your presentation. Viewers will see these annotations drawn in while watching the recorded version of your presentation. Click “Stop” and “OK” to stop the recording.

Step 5.Reset Presentation Timings as Needed
Let’s say that you had the perfect audio take, but the timings of your slide changes were off by a bit. That’s no problem; we can readily restart the process of setting your slide timings.
To do that, make sure that you’re on the Slide Show tab and click on Rehearse Timings. Your presentation will go into full screen mode and you can use the arrow keys to changes slides to set new timings.
Choose Rehearse Timings to re-do the timing of your slide changes as needed.
Now that you’re finished, you can send your presentation onto a viewer with your narration embedded. When they play the presentation, your record narration will play with it, on the timings you’ve setup while rehearsing.
Note: For more related instructions, learn more about How to Convert Your PowerPoint (PPT) to Video in our helpful tutorial on the subject.
Tips: Above free guide to record PPT presentation video in PowerPoint 2016 or PowerPoint 2013, you may wase long time to make a presentation video, and the recording audio quality is not good. In additional, the QuickTime media, which require you install a third-party QuickTime codec called ffdShow in order to achieve the compatibility. Let’s we will teach you another guide to record a PowerPoint presentation with narration and music with more convenient and intelligible.
Method 2: How to Create Powerpoint Video Presentation with Narration
To make it easy to create Powerpoint video with narration, here we highly recommend a third party program – Screen Recorder, which can help you record PowerPoint presentation with audio, in additional, you can highlight your mouse cursor with customized size and color, so that make your video looks clearer and more professional. What’s more, the Screen Recorder helps you capture online YouTube videos, games, podcasts, webinars, lectures, presentations, Skype calls, online conference, webcam videos, etc. in full screen or customized screen size. The recording Powerpoint presentation video will be saved in MP4, WMV, MOV, AVI, GIF, TS, etc. for easily playback and sharing. Furthermore, we’ll show a tutorial on the program.
Create Powerpoint Video Presentation with Audio by Screen Recorder
Step 1.Download and Launch Screen Recorder on PC or Mac
100% free to download the Screen Recorder on convert-apple-music.net and then install it. After that, you’ll see a simplified interface like this.

Step 2.Click “Video Recorder” and Customize your Recording Area for PPT
Go to “Video Recorder” function and and “V” button, then select a recording area which is suitable for your PowerPoint Presentation by choose “Full screen” or customize your recording area.

Step 3.Check Recording Audio
Don’t forget to check both “System Audio” and “Microphone”, when you’re recording presentation video to share online. Otherwise, viewers will not catch what you prepare to deliver in the video.
If you want to record an Powerpoint video presentation with your narration, please turn on both of “System Audio” and “Microphone” option.
If you don’t want to add narration to your video presentation, please turn off “Microphone” in order to record the system sound with high audio quality.

Step 4.Setting Recording Files Format
Go to “More Settings” and select “Output” to select the video formats and audio audio, also, you can choose the location to save recording videos.

Step 5.HotKeys Settings (OPTIONAL)
In “HotKeys”, you are able to set your own hotkeys to start/stop the capture, pause/resume capture and take a screenshot.

Step 6.Start to Record PPT Presentation Video
After completing the above settings, then open your prepared PPT and you are ready to give your lecture, please click on “REC” button start recording PPT presentation video. When you practice complete, please click “End” button to stop recording. What’s more, remember to click on the “Save” button at the bottom right of the screen to save the recording PPT presentation video.

When you record a PowerPoint video, you can share your amazing presentation with friends or to YouTube, Facebook or any other video-sharing site/social network. Besides, if you are looking for a solution to convert recording video to other video format or burn to DVD, you can use this Video Converter and DVD Creator.
Related Article
- How to Record Online Videos on Mac and Windows
- How to Download Youtube Videos to Your Computer
- How to Record PS4 GamePlay Video and Share to Facebook
- How to Record PS4 GamePlay Video
- How to Keep iTunes Rentals/Purchased Movies Forever
- How to Record Computer Screen with Sound on Mac
- How to Remove iTunes DRM and Convert M4V to MP4
Comments
Prompt: you need to log in before you can comment.
No account yet. Please click here to register.
 (No Ratings Yet)
No comment yet. Say something...